Creating Symbols with a Schematic
Symbols are useful when creating designs where it is impractical to show every transistor on the top level schematic (i.e. hierarchical designs). Instead symbols of the cells are created in order to instantiate them in the higher level schematics and make them more readable. In this tutorial, we will create a symbol of the inverter.
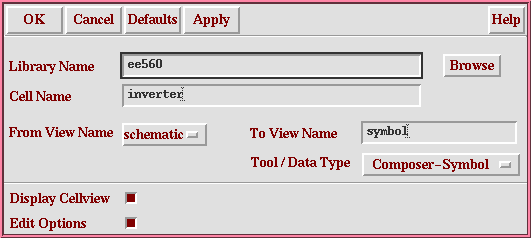
1. From the Design menu in the schematic window, select Create Cellview → From Cellview...
- A pop up menu will appear. The default information shown in the menu
will most likely be what you want. An example of the menu is shown
below.
This will pop-up another window, which will contain a default symbol picture. Usually it is a rectangle with red square dots for inp and out pins. This symbol view is created under the cell you are editing. A more meaningful symbol can then be generated by editing the symbol view itself, but this would be lost if the symbol generation program is run again. An example of an inverter symbol is shown below.
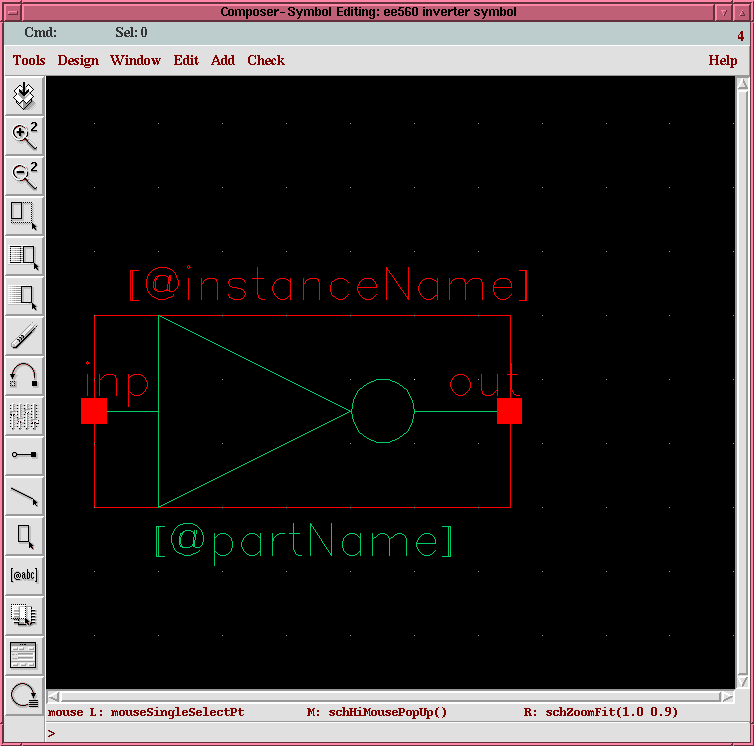
How do we get a picture like that ? First, let us review what does the figure look like. It has a red box which encloses the green colored inverter symbol. This red box defines the actual size in terms of a rectangular box, that a symbol will occupy, if you were to use this inverter in another design. You can change the size of this box. It is good custom to exactly fit the symbol within the red box. The red square dots indicate the pin connections. [@InstanceName] and [@PartName] are display variables, which you may delete or keep.
2. If you want to move any object, just move the cursor on top of
the object and type m. The object will then
move with the cursor. Or you can select the objects to be moved by drawing
a box around the objects. This can be done by clicking and holding on to
the left mouse button while you draw the box. After
highlighting the objects to be drawn, type m and the highlighted objects will move with your
cursor. Likewise, if you want to delete an object, move the cursor
on top of the object and hit the Del key. Or
highlight an object or a set of objects by drawing a box around it, as described
above and pressing the DEL key.
3. To draw a line, move your cursor to the Line icon (the icon with a descending line) and click on the left mouse button. Icons are to the left of the symbol window. Move your cursor to the location where you want to draw a line and click on the left mouse button. If you draw a closed object the, all you have to do is to click on the points where you want to change the direction of the line. However, if you're drawing just a straight line, you need to double click the left mouse button on the end point of the line to signify the completion of drawing the line.
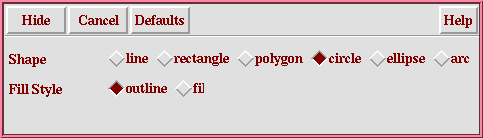
4. To draw a circle (or any other shape), first click on the Line icon and then click on the Cmd options icon (the second last icon). A pop up menu will appear. Select the Shape as circle by clicking on the diamond button as shown below.
Then move your cursor to the location where you want to draw the circle and click on the left mouse button. That is the center of you circle. Move your mouse so that the circle is as big as you desire it to be and then click on the left mouse button again. To move the circle to the desired place, follow the procedure mentioned in step 2 above.
5. You have completed your symbol. To save your work, select Check and Save from the Design menu in the symbol window. You may also save your symbol design by clicking on the Save icon which is the first icon.
6. To close the symbol window, select Close from the Window menu in the symbol window.